Contar con un sitio web con un alto porcentaje de disponibilidad es alcanzable cuando el sitio no se encuentra en un solo servidor. Al evitar un único punto de falla el sitio puede permanecer visible para los usuarios.
En este post aprenderemos como implementar Pacemaker en Rocky Linux con un servidor web Apache. Estos son los servidores que usaremos en nuestro ambiente.
192.168.100.117 www1.cluster www1
192.168.100.114 www2.cluster www2
Comenzamos la instalación de paquetes en ambos servidores y habilitamos el servicio.
~]$ sudo yum install -y pacemaker pcs resource-agents
~]$ sudo systemctl enable pcsd.service
~]$ sudo systemctl start pcsd.service
Habilitamos la aplicación en el firewall.
]$ sudo firewall-cmd --permanent --add-service=high-availability
]$ sudo firewall-cmd --reload
Con la instalación de los paquetes se creó el usuario hacluster, es necesario establecer la contraseña a este usuario ya que la necesitaremos para crear la conexión entre los servidores.
~]$ sudo passwd hacluster
Con todo lo anterior terminado ya podemos crear el cluster.
[tusysadmin@www1 ~]$ sudo pcs host auth www1 www2 -u hacluster
Password:
www2: Authorized
www1: Authorized
[tusysadmin@www1 ~]$ sudo pcs cluster setup web www1 www2
No addresses specified for host 'www1', using 'www1'
No addresses specified for host 'www2', using 'www2'
Destroying cluster on hosts: 'www1', 'www2'...
www1: Successfully destroyed cluster
www2: Successfully destroyed cluster
Requesting remove 'pcsd settings' from 'www1', 'www2'
www1: successful removal of the file 'pcsd settings'
www2: successful removal of the file 'pcsd settings'
Sending 'corosync authkey', 'pacemaker authkey' to 'www1', 'www2'
www1: successful distribution of the file 'corosync authkey'
www1: successful distribution of the file 'pacemaker authkey'
www2: successful distribution of the file 'corosync authkey'
www2: successful distribution of the file 'pacemaker authkey'
Sending 'corosync.conf' to 'www1', 'www2'
www1: successful distribution of the file 'corosync.conf'
www2: successful distribution of the file 'corosync.conf'
Cluster has been successfully set up
Habilitamos e iniciamos el cluster.
[tusysadmin@www1 ~]$ sudo pcs cluster start --all
www2: Starting Cluster...
www1: Starting Cluster...
[tusysadmin@www1 ~]$ sudo pcs cluster enable --all
www1: Cluster Enabled
www2: Cluster Enabled
[tusysadmin@www1 ~]$ sudo pcs cluster status
Cluster Status:
 Cluster Summary:
   * Stack: corosync
   * Current DC: www2 (version 2.1.0-8.el8-7c3f660707) - partition with quorum
   * Last updated: Wed Jan 26 21:01:54 2022
   * Last change:  Wed Jan 26 16:44:48 2022 by hacluster via crmd on www2
   * 2 nodes configured
   * 0 resource instances configured
 Node List:
   * Online: [ www1 www2 ]

PCSD Status:
  www1: Online
  www2: Online
El cluster cuenta con dos nodos pero lo correcto sería que contara con 3 para poder tener Quorum y «tomar decisiones» con respecto a la disponibilidad del cluster. Si se tienen 3 nodos y uno no se encuentra disponible se conservan la mayoría de los nodos. Como no contamos con un tercer nodo no es necesario tener habilitado el STONITH (Shoot The Other Node In The Head).
[tusysadmin@www1 ~]$ sudo pcs property set no-quorum-policy=ignore
[tusysadmin@www1 ~]$ sudo pcs property set stonith-enabled=false
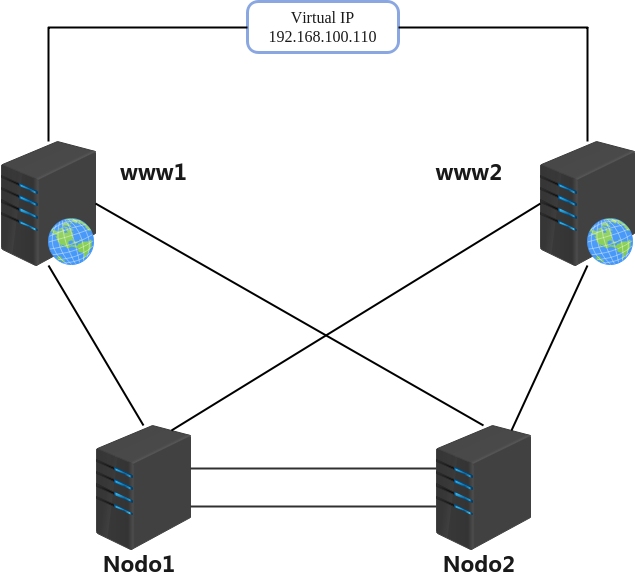
La disponibilidad del servicio web se hace a través de una IP flotante; esta IP estará asignada a uno de los nodos pero cuando éste no se encuentre disponible la IP pasará (flotará) al otro nodo. Al no afectar la visibilidad del sitio esta falla pasa desapercibida por los usuarios.
sudo pcs resource create virtual_ip ocf:heartbeat:IPaddr2 ip=192.168.100.110 cidr_netmask=24 op monitor interval=30s
La IP 192.168.100.110 es el recurso asignado en nuestro cluster y de momento se encuentra en el servidor www1, al detenerse el servicio o estar fuera de linea este servidor dicha IP cambiara a www2.
En ambos servidores instalamos, habilitamos y permitimos el tráfico en el firewall.
~]$ sudo yum install httpd -y
~]$ sudo systemctl enable --now httpd
~]$ sudo firewall-cmd --permanent --add-service http
~]$ sudo firewall-cmd --reload
Editamos el Logrotate para denegar el uso de systemd en el cluster
/var/log/httpd/*log {
    missingok
    notifempty
    sharedscripts
    delaycompress
    postrotate
#        /bin/systemctl reload httpd.service > /dev/null 2>/dev/null || true

    /usr/sbin/httpd -f /etc/httpd/conf/httpd.conf -c "PidFile /var/run/httpd/httpd.pid" -k graceful > /dev/null 2>/dev/null || true

    endscript
}
Al archivo de configuración de Apache agregamos la ruta del identificador del proceso.
PidFile /var/run/httpd/httpd.pid
Agregamos un nuevo recurso llamado webserver
~]$ sudo pcs resource create webserver apache configfile="/etc/httpd/conf/httpd.conf"
[tusysadmin@www1 ~]$ sudo pcs resource status
  * Resource Group: apache:
    * virtual_ip	(ocf::heartbeat:IPaddr2):	 Started www1
  * webserver	(ocf::heartbeat:apache):	 Started www2
La IP virtual se encuentra en el nodo www1 pero el servicio web estará respondiendo en el nodo www2
[tusysadmin@www2 ~]$ netstat -ant | grep :80
tcp6       0      0 :::80                   :::*                    LISTEN
tcp6       0      0 ::1:54942               ::1:80                  TIME_WAIT
tcp6       0      0 ::1:54940               ::1:80                  TIME_WAIT
tcp6       0      0 ::1:54946               ::1:80                  TIME_WAIT
tcp6       0      0 ::1:54938               ::1:80                  TIME_WAIT
tcp6       0      0 ::1:54936               ::1:80                  TIME_WAIT
tcp6       0      0 ::1:54944               ::1:80                  TIME_WAIT
Si detenemos el nodo www2 el tráfico http pasará al nodo www1.
[tusysadmin@www1 ~]$ sudo pcs node standby www2

[tusysadmin@www1 ~]$ sudo pcs resource status
[sudo] password for tusysadmin:
  * Resource Group: apache:
    * virtual_ip	(ocf::heartbeat:IPaddr2):	 Started www1
  * webserver	(ocf::heartbeat:apache):	 Started www1

[tusysadmin@www1 ~]$ netstat -ant | grep :80
tcp6       0      0 :::80                   :::*                    LISTEN
tcp6       0      0 ::1:39616               ::1:80                  TIME_WAIT
tcp6       0      0 ::1:39626               ::1:80                  TIME_WAIT
tcp6       0      0 ::1:39624               ::1:80                  TIME_WAIT
tcp6       0      0 ::1:39618               ::1:80                  TIME_WAIT
tcp6       0      0 ::1:39620               ::1:80                  TIME_WAIT
tcp6       0      0 ::1:39622               ::1:80                  TIME_WAIT
Él ultimo detalle que faltaría a nuestro cluster sería el de integrar un sistema de archivos para que los archivos de nuestro sitio web fueran los mismos, para esto se pudiera usar GlusterFS, NFS o iSCSI.